In this article, We are going to cover Terraform-Access Private Subnet MySQL RDS over SSH with custom VPC | Deploying EC2 instance and RDS databases within a custom VPC on AWS using Terraform
Table of Contents
What is Terraform?
- It is an open-source IaaC (Infrastructure as a code) software tool where you define and create resources using providers in the declarative configuration language example JSON.
- With Terraform, You can package and reuse the code in the form of modules.
- It supports a number of cloud infrastructure providers such as AWS, Azure, GCP, IBM Cloud, OCI, etc.
What is VPC in AWS?
AWS VPC is a logically isolated section of the AWS Cloud where you can deploy and run AWS resources. It allows you to create a private network in the cloud, providing control over the virtual networking environment, including IP address ranges, subnets, and configuration of route tables and network gateways.
What are the components of VPC in AWS?
- Private Subnet:
- No direct internet access, suitable for resources needing enhanced security, like databases.
- Public Subnet:
- Has a route to the internet via an Internet Gateway, used for resources that require public accessibility, such as web servers.
- Internet Gateway:
- A scalable and redundant component that enables communication between instances in a VPC and the internet, allowing resources in a public subnet to connect to the internet and vice versa.
- Route Table (Public):
- Routes traffic in and out of a public subnet, directing it through the Internet Gateway for internet access.
- Route Table (Private):
- Routes traffic within the VPC, typically without a direct route to the internet. Used for communication between instances in different subnets.
- Security Group:
- Acts as a virtual firewall for instances. It controls inbound and outbound traffic based on rules defined by the user, providing an additional layer of security.
- NAT Gateway:
- A managed network address translation (NAT) service that allows instances in a private subnet to initiate outbound traffic to the internet while preventing inbound traffic from reaching those instances. Useful for instances without public IP addresses.
What is EC2 instance and RDS Database in AWS?
- EC2 instance:- Amazon Elastic Compute Cloud (EC2) is a web service that provides resizable compute capacity in the cloud. It allows users to run virtual servers, known as instances, to host applications, websites, or backend services.
- RDS Database:-Amazon Relational Database Service (RDS) is a managed database service that simplifies the setup, operation, and scaling of relational databases. It supports various database engines, including MySQL, PostgreSQL, Oracle, SQL Server, and MariaDB.
VPC Architecture Overview
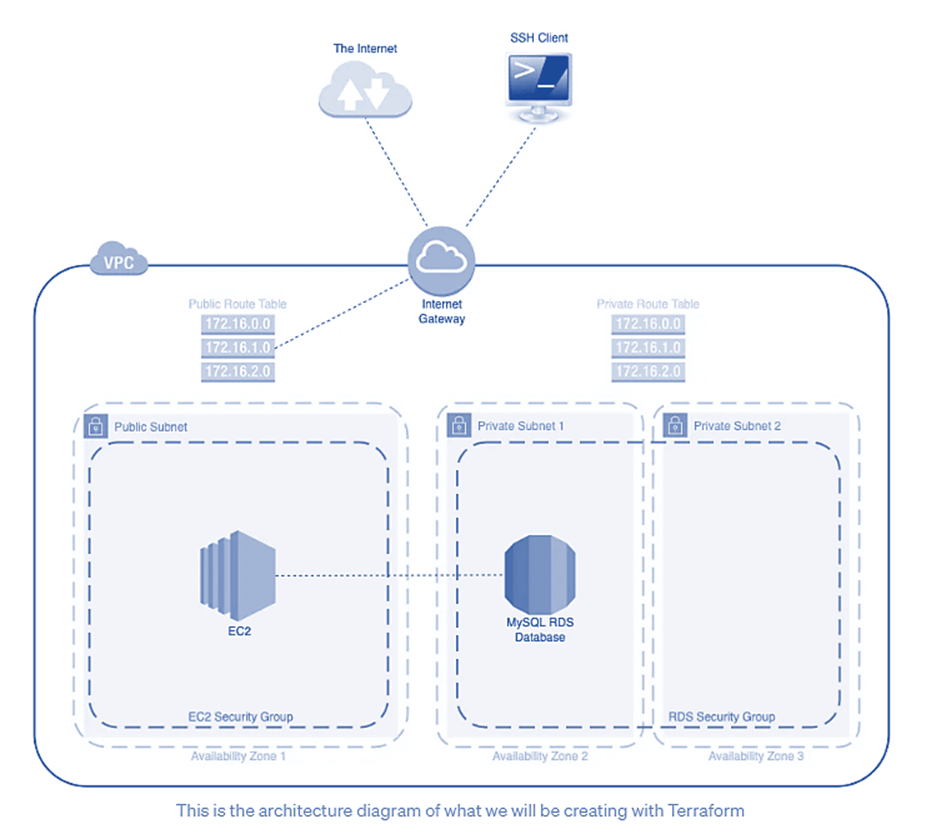
- VPC Creation:
- Begin by creating a Virtual Private Cloud (VPC) to isolate and organize your network resources.
- Internet Gateway Attachment:
- Attach an Internet Gateway to the VPC to enable communication between the VPC and the internet, facilitating public-facing resources.
- Subnet Configuration:
- Define three subnets within the VPC:
- Public Subnet (for EC2):
- Deploy an EC2 instance in the public subnet to handle public-facing workloads.
- Private Subnets (for RDS):
- Create two private subnets to house the MySQL RDS database instances, ensuring secure and controlled access.
- Public Subnet (for EC2):
- Define three subnets within the VPC:
- Route Tables:
- Establish two route tables:
- Public Route Table:
- Configure routes to the Internet Gateway, allowing outbound internet access for resources in the public subnet.
- Private Route Table:
- Restrict outbound traffic to the internet, providing a more secure environment for resources in the private subnets.
- Public Route Table:
- Establish two route tables:
- Security Groups:
- Set up two security groups:
- EC2 Security Group:
- Define inbound and outbound rules for the EC2 instance in the public subnet.
- RDS Security Group:
- Specify rules to control traffic to and from the MySQL RDS database instances in the private subnets.
- EC2 Security Group:
- Set up two security groups:
- DB Subnet Group:
- Create a Database Subnet Group, specifying the private subnets where the RDS instances will be deployed.
- MySQL RDS Database Creation:
- Deploy the MySQL RDS database within the private subnets, ensuring that it’s isolated from direct internet access for enhanced security.
- EC2 Instance Deployment:
- Launch an EC2 instance in the public subnet, which serves as a public-facing application server. Ensure proper security group associations.
- Verification:
- Validate the setup by confirming that the EC2 instance can communicate with the MySQL RDS database securely.
Requirements
- EC2 instances should be accessible anywhere on the internet via HTTP
- Everyone should be able to access the EC2 instances via SSH
- RDS should be on a private subnet and inaccessible via the internet
- Only the EC2 instances should be able to communicate with RDS
Prerequisites
- AWS CLI installed and configured
- Terraform installed
- Visual Studio Code Editor Installed
- Mobaxterm tool Installed
Steps for Implementation
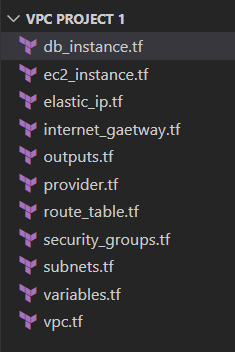
Summary view of the terraform files in VS code:
Terraform-Access Private Subnet MySQL RDS over SSH
Step 1:- Create provider.tf file
The provider.tf file in Terraform is a configuration file that specifies the cloud provider and its corresponding plugin that Terraform will use to manage resources in that provider.
Provider.tf file is used for the following:-
- Provider Declaration: Declares the cloud or infrastructure provider, such as AWS or Azure.
- Authentication Details: Includes credentials (e.g., access and secret keys) for connecting to the chosen provider.
- Region Specification: Specifies the geographic region where resources will be provisioned.
- Version Constraints: Optionally sets constraints on the provider version for compatibility.
- Additional Settings: May include other provider-specific configurations, like endpoints or custom parameters.
provider.tf
terraform {
  required_providers {
    aws = {
      source  = "hashicorp/aws"
      version = "~> 5.0"
    }
  }
}

provider "aws" {
  region = "ap-south-1"
  profile = "default"
}
data "aws_availability_zones" "available" {
  state = "available"
}
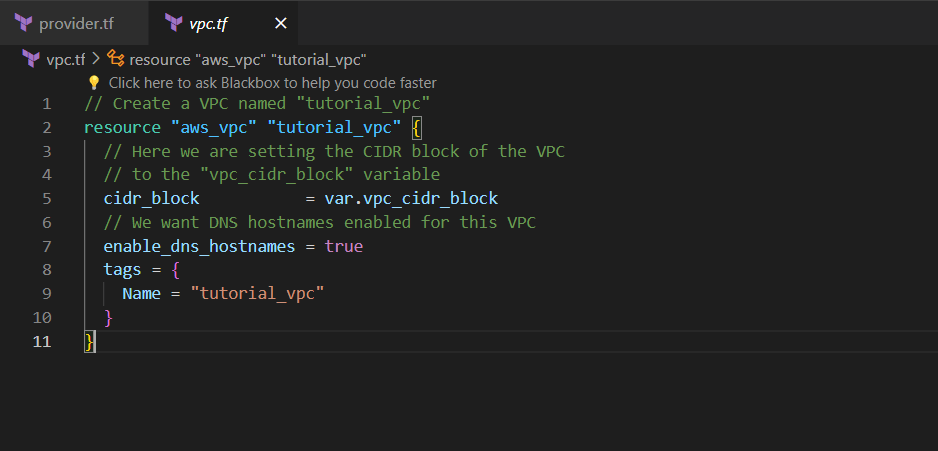
Step 2:- Create vpc.tf file
In Terraform, the vpc.tf file typically contains the configuration code for creating and defining an Amazon Virtual Private Cloud (VPC) along with its associated resources.
vpc.tf
// Create a VPC named "tutorial_vpc"
resource "aws_vpc" "tutorial_vpc" {
  // Here we are setting the CIDR block of the VPC
  // to the "vpc_cidr_block" variable
  cidr_block           = var.vpc_cidr_block
  // We want DNS hostnames enabled for this VPC
  enable_dns_hostnames = true
  tags = {
    Name = "tutorial_vpc"
  }
}
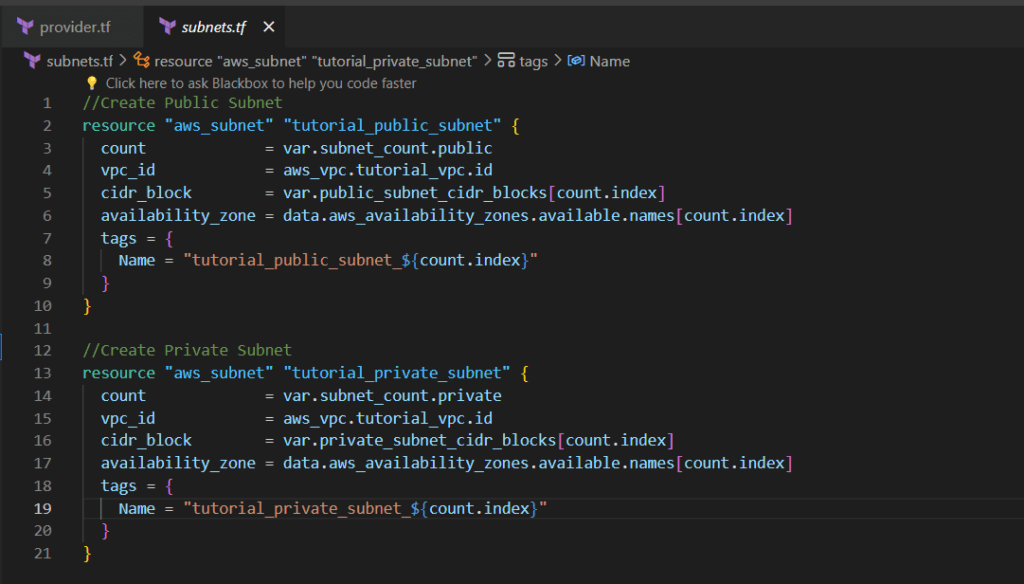
Step 3:- Create subnets.tf file
A subnets.tf file in Terraform defines and configures subnets within an AWS Virtual Private Cloud (VPC), specifying attributes such as CIDR blocks, Availability Zones, and route table associations.
subnets.tf
//Create Public Subnet
resource "aws_subnet" "tutorial_public_subnet" {
  count             = var.subnet_count.public
  vpc_id            = aws_vpc.tutorial_vpc.id
  cidr_block        = var.public_subnet_cidr_blocks[count.index]
  availability_zone = data.aws_availability_zones.available.names[count.index]
  tags = {
    Name = "tutorial_public_subnet_${count.index}"
  }
}

//Create Private Subnet
resource "aws_subnet" "tutorial_private_subnet" {
  count             = var.subnet_count.private
  vpc_id            = aws_vpc.tutorial_vpc.id
  cidr_block        = var.private_subnet_cidr_blocks[count.index]
  availability_zone = data.aws_availability_zones.available.names[count.index]
  tags = {
    Name = "tutorial_private_subnet_${count.index}"
  }
}
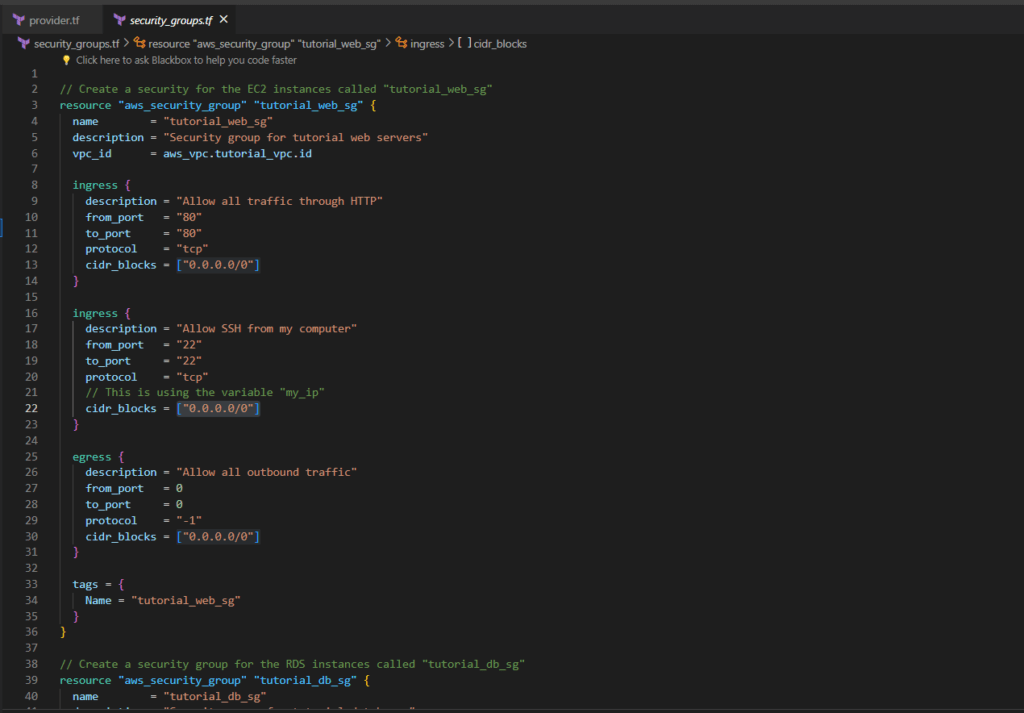
Step 4:- Create security_groups.tf file
The security_groups.tf file in Terraform is vital for configuring application security, focusing on security groups for EC2 instances and RDS instance. Within this file, you define security group configurations for EC2 instances and RDS Database instance, specifying open ports and allowed protocols for inbound and outbound traffic.
security_groups.tf
// Create a security for the EC2 instances called "tutorial_web_sg"
resource "aws_security_group" "tutorial_web_sg" {
  name        = "tutorial_web_sg"
  description = "Security group for tutorial web servers"
  vpc_id      = aws_vpc.tutorial_vpc.id

  ingress {
    description = "Allow all traffic through HTTP"
    from_port   = "80"
    to_port     = "80"
    protocol    = "tcp"
    cidr_blocks = ["0.0.0.0/0"]
  }

  ingress {
    description = "Allow SSH from my computer"
    from_port   = "22"
    to_port     = "22"
    protocol    = "tcp"
    // This is using the variable "my_ip"
    cidr_blocks = ["0.0.0.0/0"]
  }

  egress {
    description = "Allow all outbound traffic"
    from_port   = 0
    to_port     = 0
    protocol    = "-1"
    cidr_blocks = ["0.0.0.0/0"]
  }

  tags = {
    Name = "tutorial_web_sg"
  }
}

// Create a security group for the RDS instances called "tutorial_db_sg"
resource "aws_security_group" "tutorial_db_sg" {
  name        = "tutorial_db_sg"
  description = "Security group for tutorial databases"
  vpc_id      = aws_vpc.tutorial_vpc.id

  ingress {
    description     = "Allow MySQL traffic from only the web sg"
    from_port       = "3306"
    to_port         = "3306"
    protocol        = "tcp"
    security_groups = [aws_security_group.tutorial_web_sg.id]
  }

  tags = {
    Name = "tutorial_db_sg"
  }
}

// Create a db subnet group named "tutorial_db_subnet_group"
resource "aws_db_subnet_group" "tutorial_db_subnet_group" {
  name        = "tutorial_db_subnet_group"
  description = "DB subnet group for tutorial"
  subnet_ids  = [for subnet in aws_subnet.tutorial_private_subnet : subnet.id]
}
Step 5:- Create ec2_instance.tf file
The ec2_instance.tf file in Terraform typically contains configurations for creating Amazon EC2 instances. It defines the instance type, Amazon Machine Image (AMI), key pair for SSH access, security groups, and other settings. Additionally, it may include outputs to provide information about the created EC2 instances, such as their public IP addresses or DNS names. This file plays a crucial role in defining the virtual machines within the infrastructure.
ec2_instance.tf
// Create an EC2 instance named "tutorial_web"
resource "aws_instance" "tutorial_web" {
  count = var.settings.web_app.count
  ami                    = "ami-0287a05f0ef0e9d9a"
  instance_type          = var.settings.web_app.instance_type
  subnet_id              = aws_subnet.tutorial_public_subnet[count.index].id
  key_name               = "three-tier"
  vpc_security_group_ids = [aws_security_group.tutorial_web_sg.id]
  tags = {
    Name = "tutorial_web_${count.index}"
  }
}
Step 6:- Create db_intsance.tf file
The db_instance.tf file typically contains Terraform configurations for creating an Amazon RDS instance. It defines settings such as the database engine, instance class, allocated storage, and other parameters. Additionally, it associates the RDS instance with a subnet group, specifies security groups, and outputs details like the database address and port for reference in other parts of the infrastructure.
db_instance.tf
resource "aws_db_instance" "tutorial_database" {
allocated_storage = 10
engine = "mysql"
engine_version = "5.7"
instance_class = "db.t2.micro"
username = "admin"
password = "admin12345678"
db_name = "tutorial"
parameter_group_name = "default.mysql5.7"
skip_final_snapshot = true
db_subnet_group_name = aws_db_subnet_group.tutorial_db_subnet_group.id
vpc_security_group_ids = [aws_security_group.tutorial_db_sg.id]
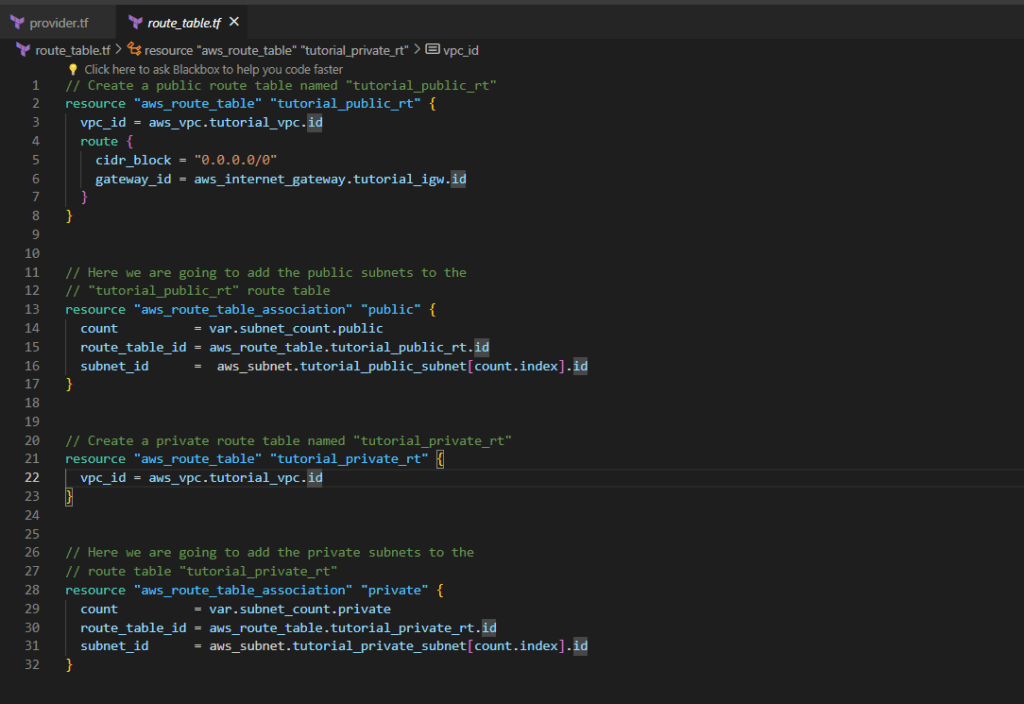
}Step 7:- Create route_table.tf file
The route_table.tf file in Terraform is responsible for configuring route tables, crucial for directing network traffic within a Virtual Private Cloud (VPC). By creating a route table to route traffic through the internet gateway we will give internet access to the VPC.
route_table.tf
// Create a public route table named "tutorial_public_rt"
resource "aws_route_table" "tutorial_public_rt" {
  vpc_id = aws_vpc.tutorial_vpc.id
  route {
    cidr_block = "0.0.0.0/0"
    gateway_id = aws_internet_gateway.tutorial_igw.id
  }
}


// Here we are going to add the public subnets to the
// "tutorial_public_rt" route table
resource "aws_route_table_association" "public" {
  count          = var.subnet_count.public
  route_table_id = aws_route_table.tutorial_public_rt.id
  subnet_id      = 	aws_subnet.tutorial_public_subnet[count.index].id
}


// Create a private route table named "tutorial_private_rt"
resource "aws_route_table" "tutorial_private_rt" {
  vpc_id = aws_vpc.tutorial_vpc.id
}


// Here we are going to add the private subnets to the
// route table "tutorial_private_rt"
resource "aws_route_table_association" "private" {
  count          = var.subnet_count.private
  route_table_id = aws_route_table.tutorial_private_rt.id
  subnet_id      = aws_subnet.tutorial_private_subnet[count.index].id
}
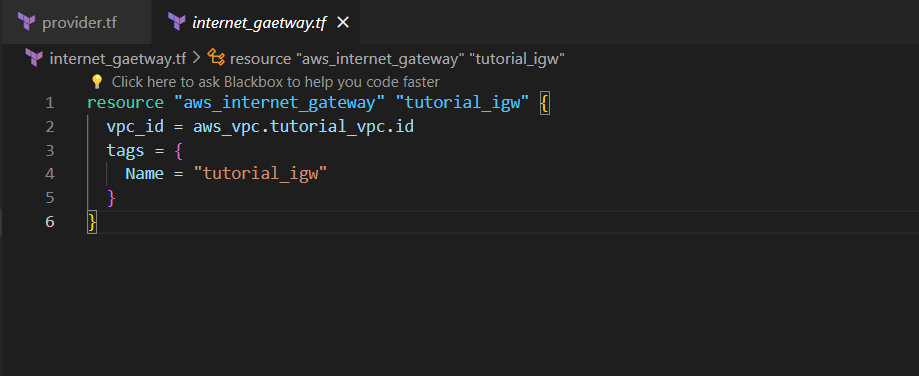
Step 8:- Create internet_gateway.tf file
An internet_gateway.tf file in Terraform typically configures the creation of an Internet Gateway for an Amazon Virtual Private Cloud (VPC) in AWS, enabling communication between instances within the VPC and the internet.
internet_gateway.tf
resource "aws_internet_gateway" "tutorial_igw" {
  vpc_id = aws_vpc.tutorial_vpc.id
  tags = {
    Name = "tutorial_igw"
  }
}
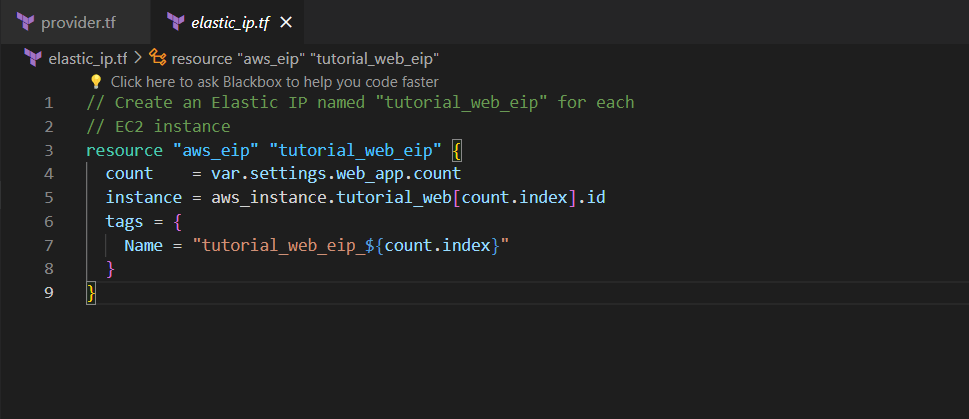
Step 9:- Create elastic_ip.tf file
An elastic_ip.tf file in Terraform is used to define and configure Elastic IP (EIP) resources in AWS, providing static public IP addresses that can be associated with EC2 instances or other resources, allowing them to be accessed consistently over the internet.
elastic_ip.tf
// Create an Elastic IP named "tutorial_web_eip" for each
// EC2 instance
resource "aws_eip" "tutorial_web_eip" {
  count    = var.settings.web_app.count
  instance = aws_instance.tutorial_web[count.index].id
  tags = {
    Name = "tutorial_web_eip_${count.index}"
  }
}
Step 10:- Create variables.tf file
A variables.tf file in Terraform is where you define input variables for your infrastructure code, allowing for customization and flexibility by parameterizing values that can be easily modified without changing the core code.
variables.tf
variable "vpc_cidr_block" {
  description = "CIDR block for VPC"
  type        = string
  default     = "10.0.0.0/16"
}


variable "subnet_count" {
  description = "Number of subnets"
  type        = map(number)
  default = {
    public  = 1,
    private = 2
  }
}

variable "settings" {
  description = "Configuration settings"
  type        = map(any)
  default = {
    "database" = {
      allocated_storage   = 10
      engine              = "mysql"
      engine_version      = "5.7"
      instance_class      = "db.t2.micro"

      skip_final_snapshot = true


    },
    "web_app" = {
      count         = 1
      instance_type = "t2.micro"
    }
  }
}


variable "public_subnet_cidr_blocks" {
  description = "Available CIDR blocks for public subnets"
  type        = list(string)
  default = [
    "10.0.1.0/24",
    "10.0.2.0/24",
    "10.0.3.0/24",
    "10.0.4.0/24"
  ]
}


variable "private_subnet_cidr_blocks" {
  description = "Available CIDR blocks for private subnets"
  type        = list(string)
  default = [
    "10.0.101.0/24",
    "10.0.102.0/24",
    "10.0.103.0/24",
    "10.0.104.0/24",
  ]
}

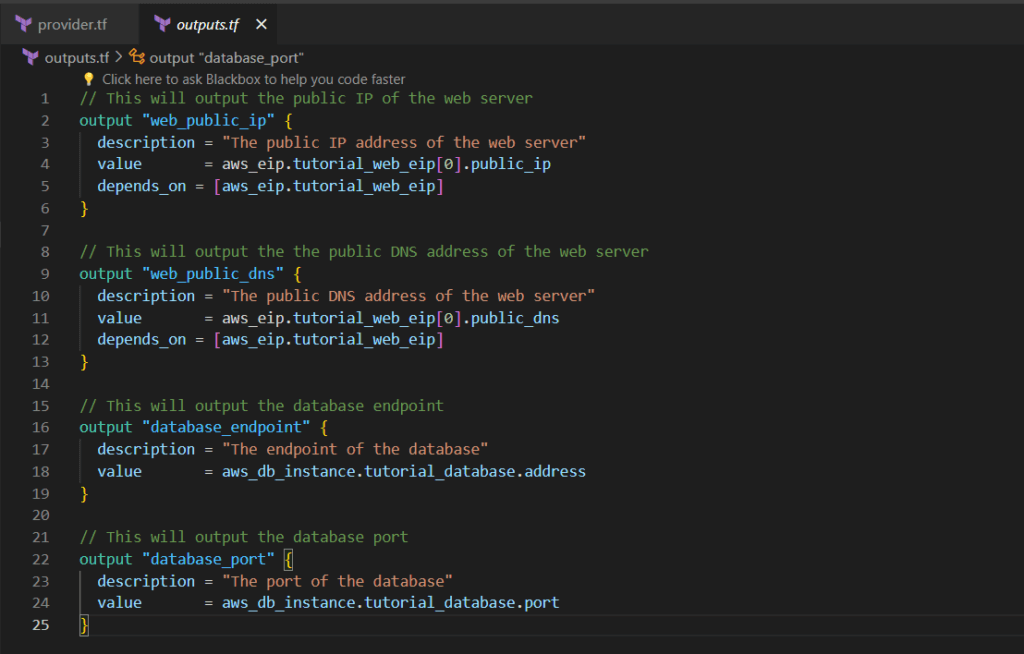
Step 11:- Create outputs.tf file
An outputs.tf file in Terraform defines output values that you want to display after the infrastructure deployment, providing a way to expose specific information, such as resource IDs or computed results, for easier access or use in subsequent processes.
outputs.tf
// This will output the public IP of the web server
output "web_public_ip" {
  description = "The public IP address of the web server"
  value       = aws_eip.tutorial_web_eip[0].public_ip
  depends_on = [aws_eip.tutorial_web_eip]
}

// This will output the the public DNS address of the web server
output "web_public_dns" {
  description = "The public DNS address of the web server"
  value       = aws_eip.tutorial_web_eip[0].public_dns
  depends_on = [aws_eip.tutorial_web_eip]
}

// This will output the database endpoint
output "database_endpoint" {
  description = "The endpoint of the database"
  value       = aws_db_instance.tutorial_database.address
}

// This will output the database port
output "database_port" {
  description = "The port of the database"
  value       = aws_db_instance.tutorial_database.port
}
Step 12:- Let’s deploy!
Let’s run our configuration and make sure everything works correctly. On the command line, run the following commands:
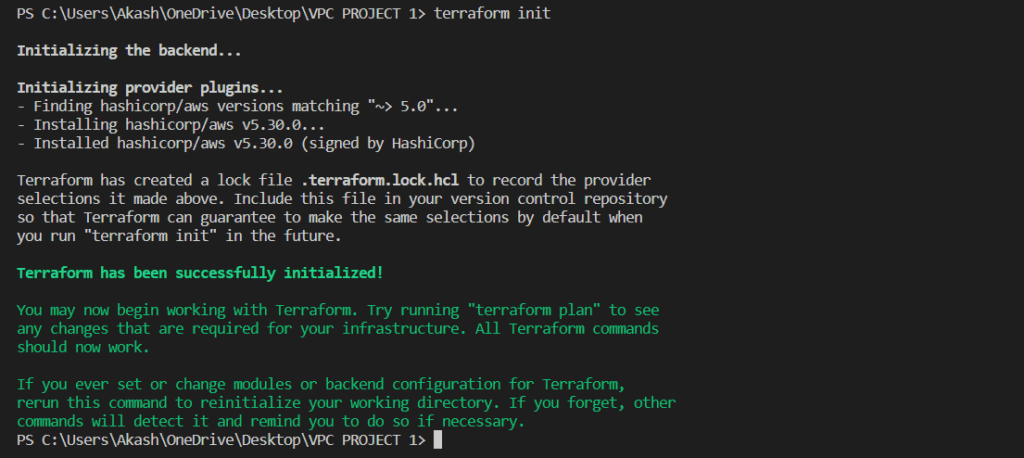
- terraform init
The terraform init the command is used to initialize a new or existing Terraform configuration. This command downloads the required provider plugins and sets up the backend for storing state.
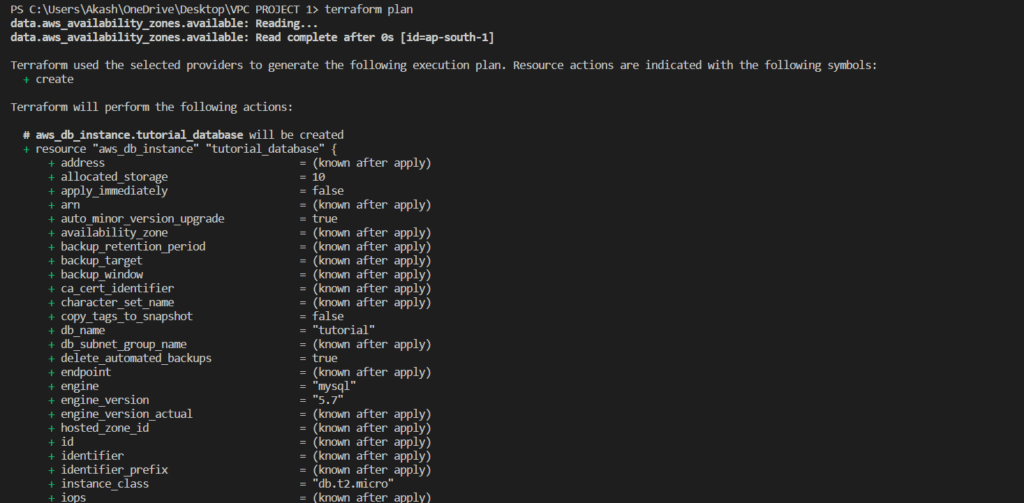
- terraform plan
The terraform plan the command is used to create an execution plan for the Terraform configuration. This command shows what resources Terraform will create, modify, or delete when applied.

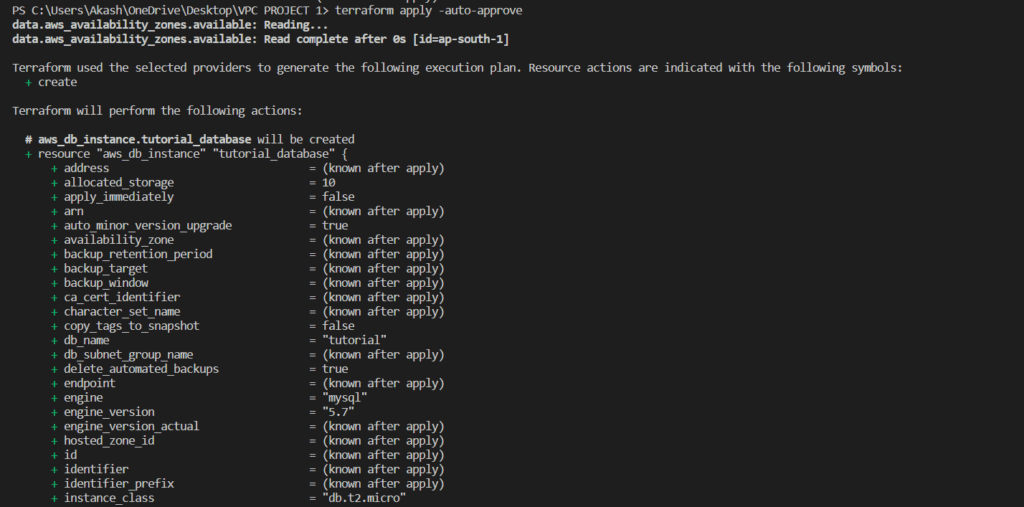
- terraform apply
The terraform apply the command is used to apply the Terraform configuration and create or modify resources in the target environment.

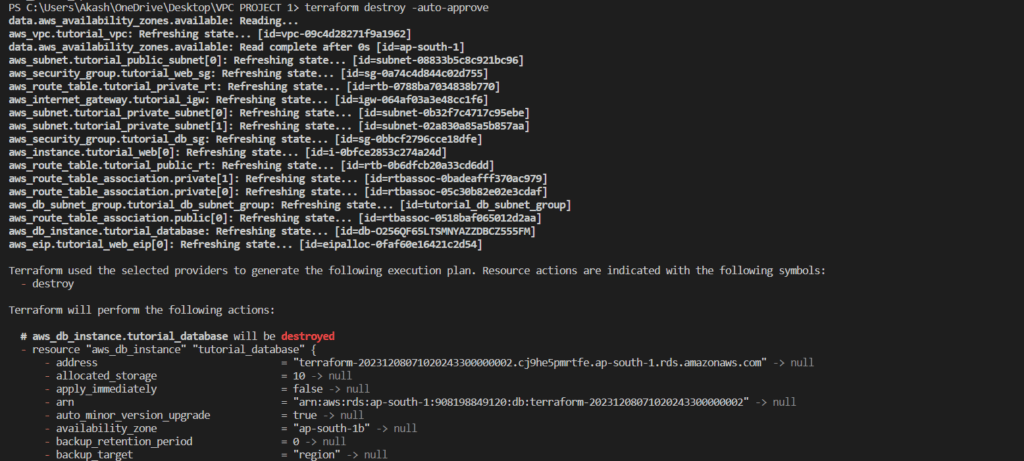
- terraform destroy
The primary purpose of terraform destroy is to remove all the resources that were created by the Terraform configuration.

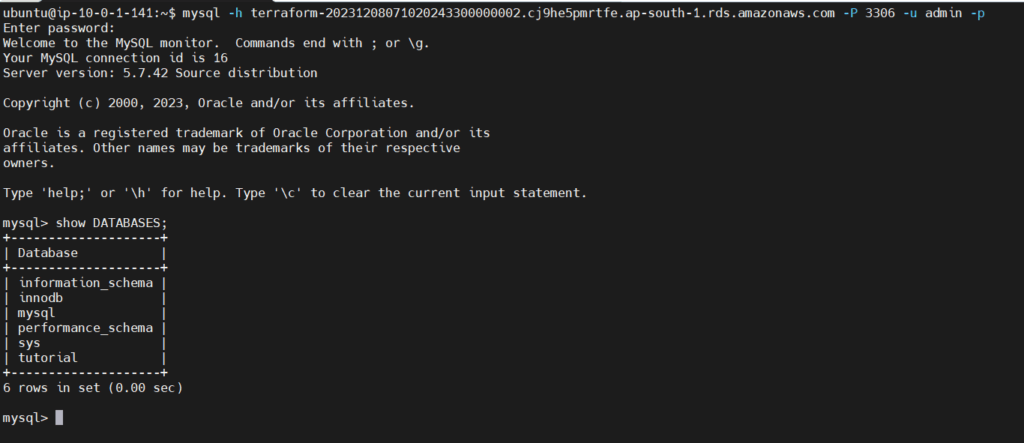
Step 13:- Connect to the RDS instance
First, Connect the EC2 instance using Mobaxterm to perform operations.
Once connected to the EC2 instance, let’s try connecting to the RDS instance. First, we will need to install the MySQL client. Run the following command:
sudo apt-get update -y && sudo apt install mysql-client -y

Once that MySQL client is installed, let’s try connecting to the RDS instance.
- The <database-endpoint> is going to be your database_endpoint from the terraform output
- The <database-port> is going to be your database_port from the terraform output
- The <db-username> is going to be your DB username, which was the db_username that you created in your secrets
mysql -h <database-endpoint> -P <database-port> -u <db-username> -p
Now, enter the password which is
admin12345678
We are connected to the MySQL RDS database. Let’s see if our database was created. Run the following command in the MySQL terminal
show DATABASES;
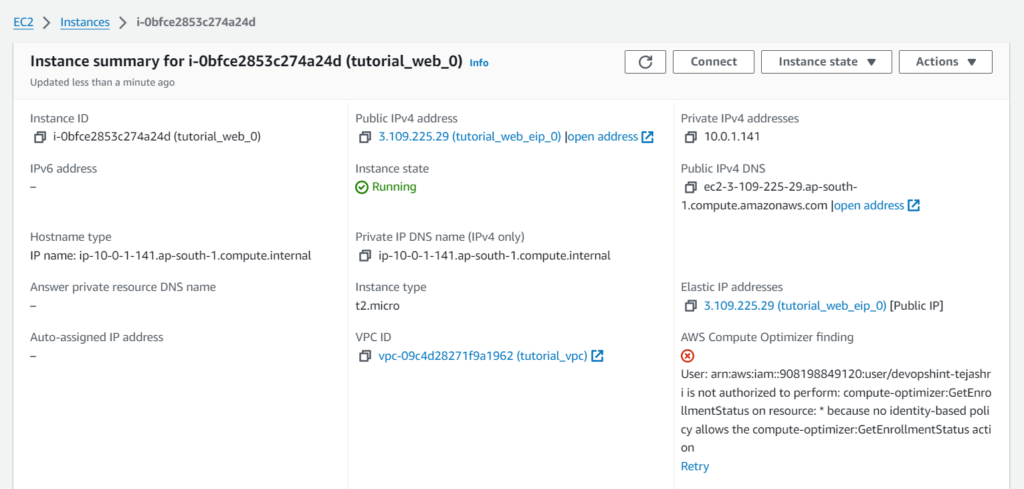
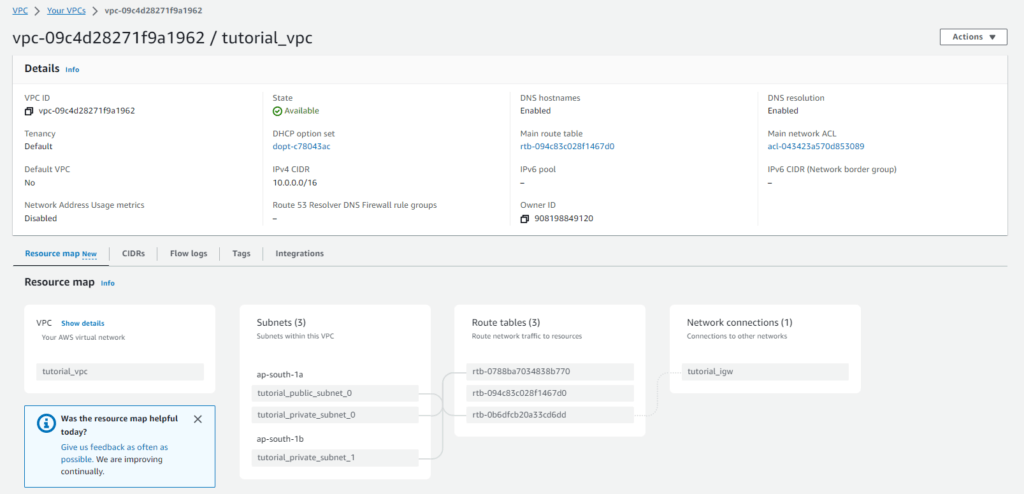
Step 14:- Go to the AWS console and verify
EC2 Instance:-

VPC:-
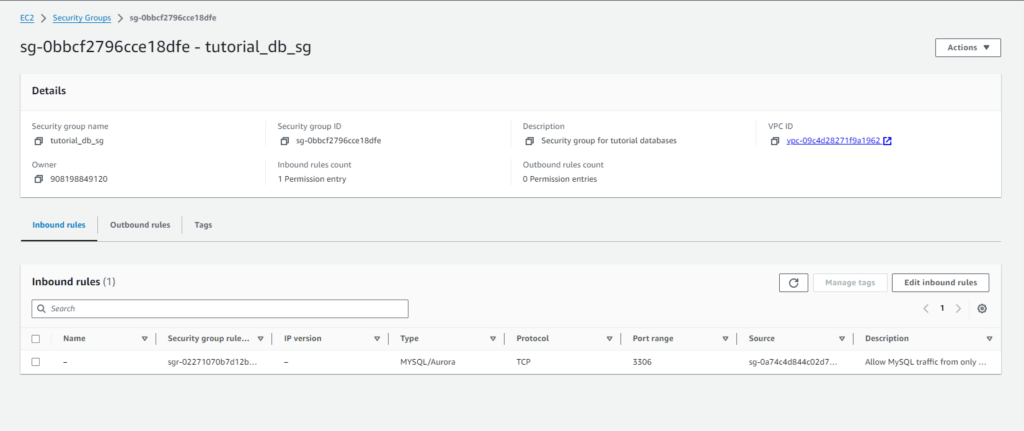
Security Groups:-

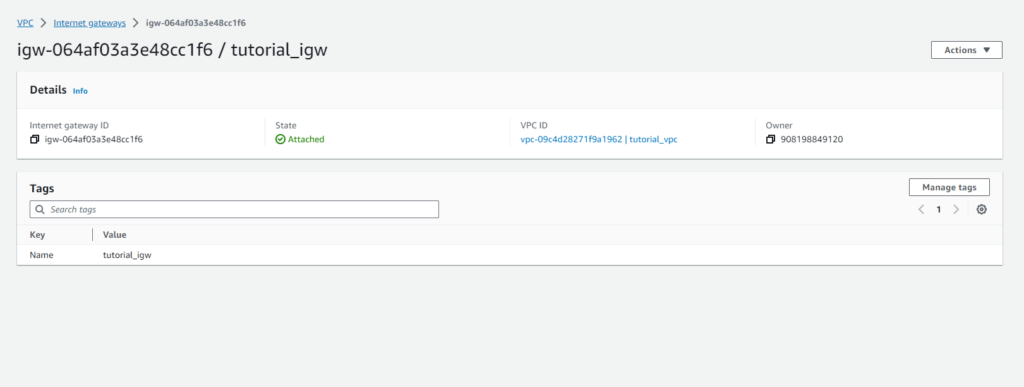
Internet Gateway:-
RDS Database Instance:-


We have covered Terraform-Access Private Subnet MySQL RDS over SSH.
Conclusion:
In conclusion, utilizing Terraform to create an EC2 instance and an RDS database within a custom VPC on AWS streamlines infrastructure deployment, enhancing scalability, security, and automation. This approach ensures a well-architected environment, seamlessly integrating compute and database resources while adhering to best practices in cloud infrastructure management.
Reference:-
For reference visit the official website TerraformRegistry.
Any queries pls contact us @Devopshint.
Related Articles:
Terraform State File Management | Terraform Local State File | Terraform Remote State