In this article we are going to cover Terraform Cloud Tutorial | Create Variables Set | VCS-Driven Workflow | Create EC2 using Terraform Cloud
Table of Contents
Introduction to Terraform Cloud and Workflows
Terraform Cloud is a collaboration platform for Terraform, HashiCorp’s Infrastructure as Code (IaC) tool. It provides a centralized environment for managing Terraform configurations, state files, and collaboration among team members. Terraform Cloud offers several features that enhance the Terraform workflow, including remote state storage, collaboration tools, and run management.
Key Concepts in Terraform Cloud
1) Remote State Management:
- State Files: Terraform uses state files to keep track of the resources it manages. In a collaborative environment, storing state files remotely becomes crucial for sharing and locking mechanisms to avoid conflicts.
- Remote Backends: Terraform Cloud provides a remote backend where state files are stored securely, allowing multiple team members to collaborate on the same infrastructure.
2) Collaboration:
- Team Workspaces: Terraform Cloud allows you to organize your configurations into workspaces. Each workspace can represent a different environment (e.g., development, staging, production).
- Access Control: Fine-grained access controls enable you to manage who can read, write, and execute Terraform configurations in different workspaces.
3) Run Management:
- Run Execution: Terraform Cloud executes Terraform runs (plan and apply) in a controlled environment. This ensures consistent execution and provides logs and outputs for review.
- VCS Integration: Integrates with version control systems (e.g., GitHub, GitLab) to trigger Terraform runs automatically when changes are pushed to the repository.
4) Variables and Secrets:
- Input Variables: Define input variables for Terraform configurations, making it easy to customize settings for different environments.
- Sensitive Data: Terraform Cloud allows you to store sensitive data like API keys and passwords securely using workspace-level variables.
Workflows:
- Configuration Authoring:
- Write Terraform configurations using HashiCorp Configuration Language (HCL) or JSON to describe your infrastructure.
2.Version Control Integration:
- Connect Terraform Cloud to your version control system to automatically trigger Terraform runs when changes are made to the infrastructure code.
3.Remote Execution:
- Instead of running Terraform commands locally, use Terraform Cloud to execute plans and apply changes remotely.
4.State Management:
- Benefit from centralized state management, reducing the risk of state file conflicts and ensuring consistency across the team.
5.Collaboration:
- Collaborate with team members by organizing configurations into workspaces and controlling access based on roles and permissions.
6.Notifications and Outputs:
- Receive notifications on run status and view detailed logs and outputs, facilitating troubleshooting and auditing.
7.Scaling Infrastructure:
- Easily scale infrastructure by adjusting configuration files, and manage changes and updates centrally through Terraform Cloud.
8.Policy Enforcement:
- Enforce policies and compliance checks using Sentinel policies, ensuring that infrastructure changes adhere to organizational standards.
Terraform Cloud simplifies the management of infrastructure as code in collaborative environments, providing a secure and controlled way to automate and manage your infrastructure lifecycle. It is particularly valuable for teams working on large-scale projects or in complex, multi-environment scenarios.
Sign-up to Terraform Cloud
Signing up for Terraform Cloud is a straightforward process. Here are the general steps to create an account and get started with Terraform Cloud:
- Visit the Terraform Cloud Website:
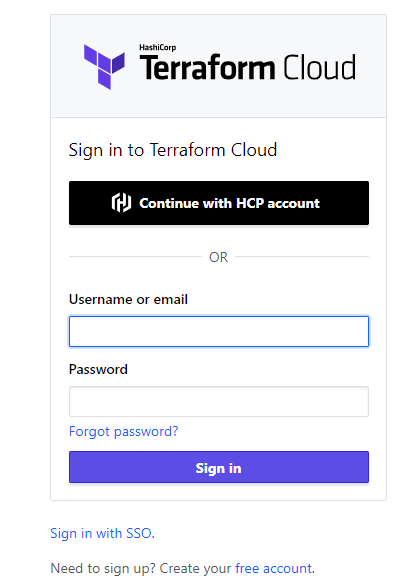
Open your web browser and go to the Terraform Cloud website: https://app.terraform.io/ - Click on “Sign Up for Free”:
On the Terraform Cloud homepage, you’ll typically find a “Sign Up for Free” or a similar call-to-action button. Click on it to begin the sign-up process.
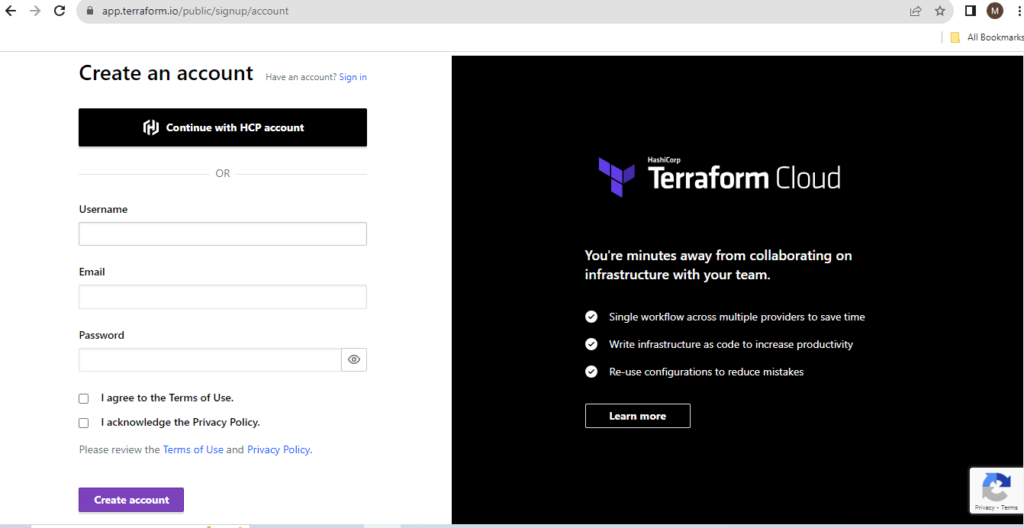
3. Create a HashiCorp Account:
- If you don’t have a HashiCorp account, you’ll be prompted to create one. Fill in the required information, including your email address and a password.
- If you already have a HashiCorp account, you can log in using your existing credentials.
4. Verify Your Email:
- After providing your information, you may need to verify your email address. Check your email inbox for a verification message and follow the instructions to verify your account.
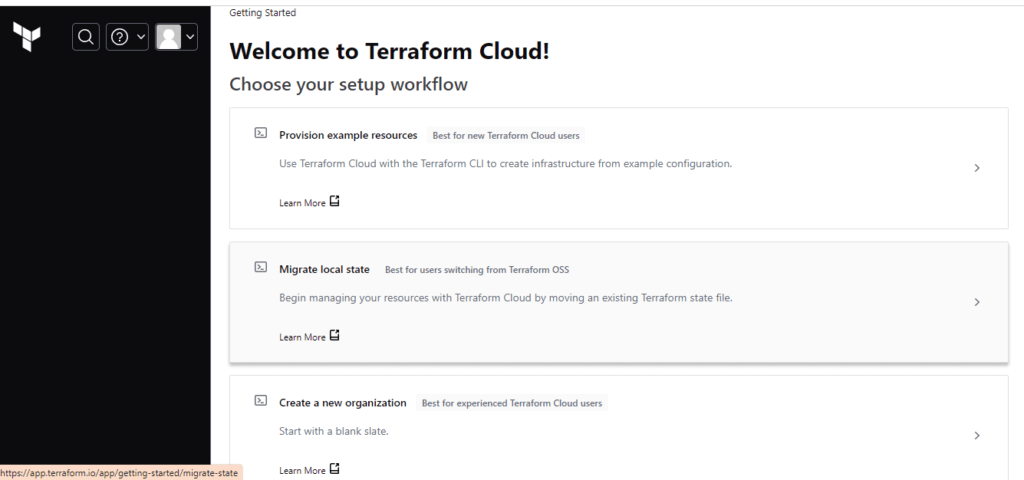
5. Set Up Your Organization:
- Once your email is verified, you’ll be asked to set up your organization. Provide a name for your organization, and you can also choose to create a new workspace immediately or skip this step to set it up later.
6. Connect Version Control (Optional):
- If you want to connect Terraform Cloud to a version control system (e.g., GitHub, GitLab, Bitbucket), you can do so during the setup process. This step is optional, and you can set up version control integration later if needed.
7. Complete Setup:
- Follow the on-screen instructions to complete the setup process. This may include creating an initial workspace or skipping this step to do it later.
8. Access Your Terraform Cloud Dashboard:
- Once the setup is complete, you’ll be directed to your Terraform Cloud dashboard. This is where you can manage your workspaces, configurations, and collaborate with your team.
9. Configure Workspaces:
- Depending on your needs, you can configure workspaces for different environments (e.g., development, staging, production) and set up variables, version control integration, and other settings for each workspace.
10. Start Using Terraform Cloud:
- You are now ready to start using Terraform Cloud. You can begin by uploading your Terraform configurations, triggering runs, and leveraging the collaboration features offered by Terraform Cloud.
Remember that these steps may vary slightly based on any updates or changes to the Terraform Cloud sign-up process. Always refer to the official Terraform Cloud documentation for the most accurate and up-to-date information.
Create New Organization in Terraform Cloud
Creating a new organization in Terraform Cloud involves signing up for a HashiCorp account (if you don’t have one), logging into Terraform Cloud, and setting up a new organization. Here are step-by-step instructions:
1. Visit the Terraform Cloud Website:
Open your web browser and go to the Terraform Cloud website: https://app.terraform.io/
2. Sign Up or Log In:
- If you don’t have a HashiCorp account, click on “Sign Up for Free” and follow the instructions to create a new account. If you already have an account, click on “Log In” and enter your credentials.
3. Access the Terraform Cloud Dashboard:
- After logging in, you will be directed to the Terraform Cloud dashboard.
4.Navigate to the Organizations Page:
- In the left navigation menu, click on “Organizations.” If you don’t see this option, it may be available under the “Settings” section.
5. Create a New Organization:
- On the Organizations page, you will typically find a button or link to create a new organization. It may be labeled as “Create Organization,” “New Organization,” or something similar. Click on this button.

6. Provide Organization Details:
- You will be prompted to provide details for your new organization. This may include the organization’s name, email, and other relevant information.

7. Choose a Plan:
- Select the plan that best suits your needs. Terraform Cloud typically offers a free tier with basic features and paid plans with additional capabilities.
8. Set Up Workspaces (Optional):
- During the organization setup process, you may have the option to create initial workspaces. Workspaces in Terraform Cloud represent different environments or projects. You can create them now or do it later.
9. Complete Organization Creation:
- Follow the on-screen instructions to complete the creation of your new organization. This may include confirming your email address, setting up version control integration, and configuring other organization settings.
- Access Your Organization:
- Once the organization setup is complete, you will be directed to the organization’s dashboard. Here, you can manage organization settings, invite team members, and create or import workspaces.
- Invite Team Members (Optional):
- If you are working in a team, you can invite team members to join your organization. This allows for collaboration on Terraform configurations.
You have now successfully created a new organization in Terraform Cloud. You can start using the platform to manage your infrastructure as code, collaborate with your team, and take advantage of Terraform Cloud’s features. Always refer to the official Terraform Cloud documentation for any specific details or updates.
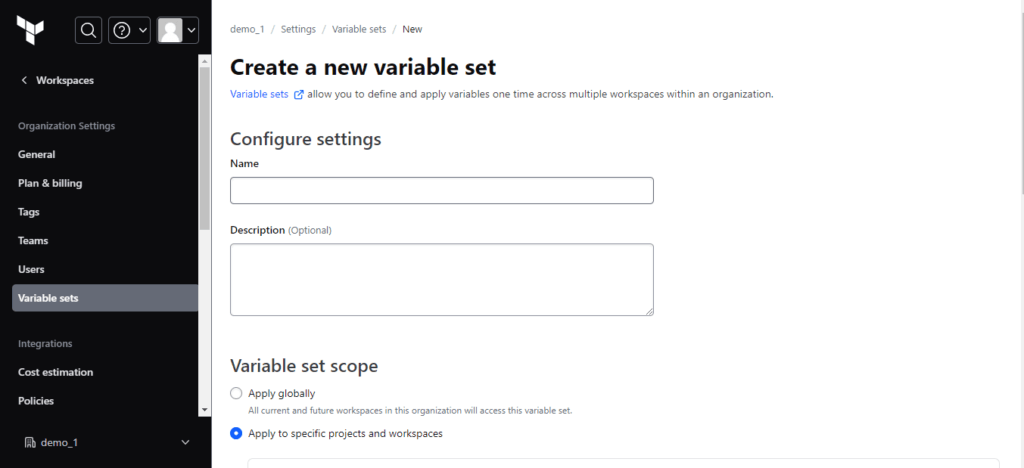
Create a Credentials Variable Set in Terraform Cloud
As of my last knowledge update in January 2022, Terraform Cloud does not inherently support a direct mechanism called “Credentials Variable Set” in the same way that some other systems might have. However, you can use Terraform Cloud’s workspace variables to store sensitive information securely. Here’s how you can manage credentials using Terraform Cloud:
1. Create a Workspace:
- Log in to your Terraform Cloud account.
- Navigate to the “Workspaces” page.
- Click on “Create a new workspace.”
- Select the version control system (VCS) where your Terraform configuration is stored.
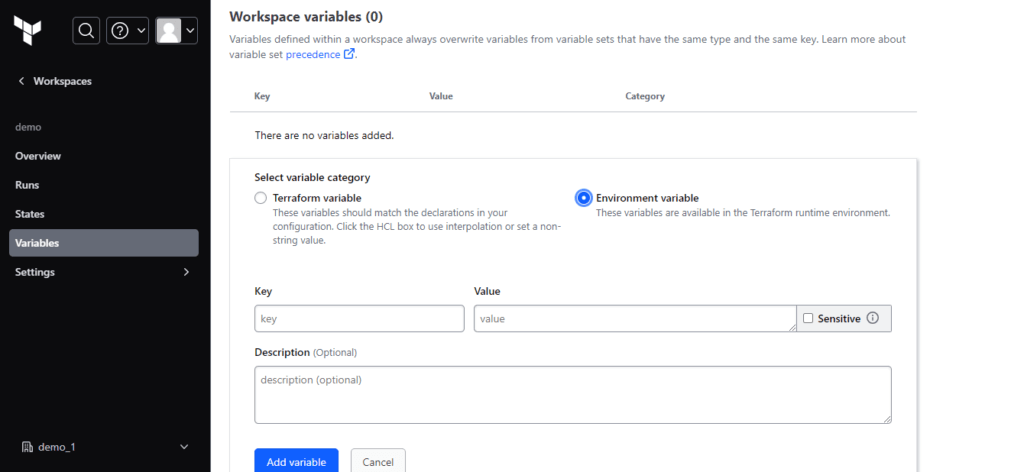
2. Configure Workspace Variables:
- After creating the workspace, go to the workspace settings.
- Navigate to the “Variables” tab.

3. Add Sensitive Variables:
- Click on “Add Variable.”
- Set the variable name, and in the “Sensitive” field, mark it as true to indicate that it contains sensitive information.
4. Configure Variable Values:
- Enter the sensitive values for your credentials. These values are encrypted and securely stored by Terraform Cloud.

Example:
Let’s say you have AWS access and secret keys:
- Variable Name:
AWS_ACCESS_KEY_ID - Value:
<your-access-key> - Sensitive: Checked (true)
- Variable Name:
AWS_SECRET_ACCESS_KEY - Value:
<your-secret-key> - Sensitive: Checked (true)
5. Use Variables in Terraform Configurations:
- In your Terraform configuration files, reference these variables using the
var.variable_namesyntax.
   provider "aws" {
     access_key = var.AWS_ACCESS_KEY_ID
     secret_key = var.AWS_SECRET_ACCESS_KEY
     region     = "us-west-2"
   }
Important Notes:
- Terraform Cloud Security:
- Terraform Cloud encrypts sensitive values at rest and in transit. However, always follow security best practices, and avoid exposing sensitive information unnecessarily.
- Workspaces for Environments:
- Consider creating different workspaces for different environments (e.g., dev, staging, prod) to manage variables specific to each environment.
- Terraform Cloud Documentation:
- Terraform Cloud features and capabilities may evolve. Always refer to the latest Terraform Cloud documentation for the most up-to-date information.
By using workspace variables marked as sensitive, you can securely manage and utilize credentials within Terraform Cloud. Always prioritize the security and best practices for managing sensitive information in your infrastructure.
Create CLI DrivenWorkspace in Terraform Cloud
Creating a workspace in Terraform Cloud is a crucial step in managing your infrastructure as code. Here’s a step-by-step guide on how to create a new workspace:
Prerequisites:
- Terraform Cloud Token:
- Obtain a Terraform Cloud API token from your Terraform Cloud account.
- Terraform Configuration:
- Ensure that your Terraform configurations are versioned and stored in a version control system.
Steps:
- Authenticate with Terraform Cloud:
   export TF_CLI_CONFIG_FILE=~/.terraformrc

   terraform login
This command will prompt you to enter your Terraform Cloud API token.
- Create a New Workspace Configuration File: Create a configuration file for the new workspace .
   terraform {
  cloud {
    organization = "demo_1"

    workspaces {
      name = "cli_driven"
    }
  }
}
Replace placeholders with your actual values.

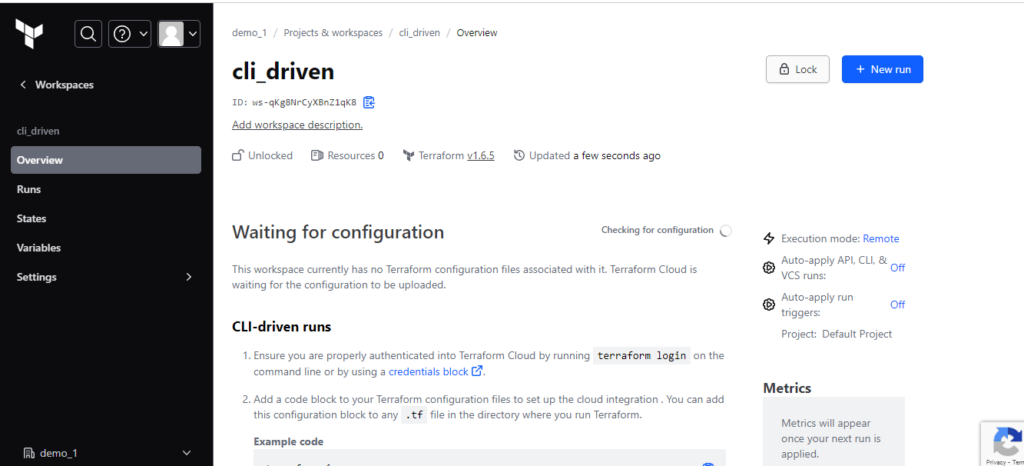
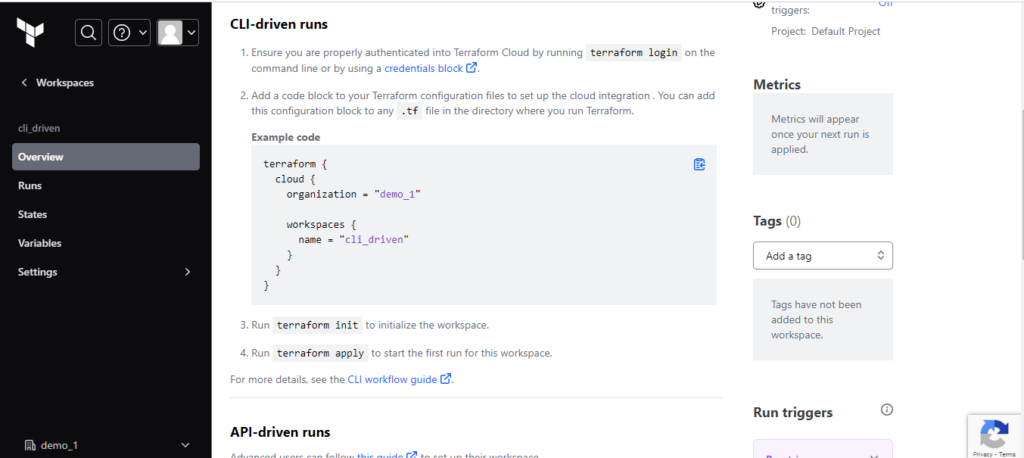
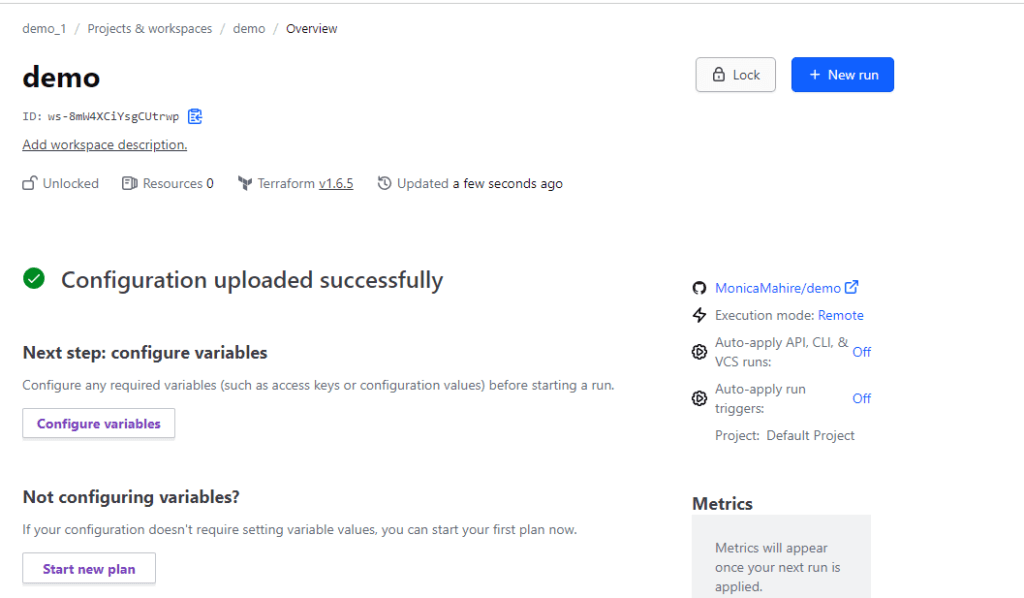
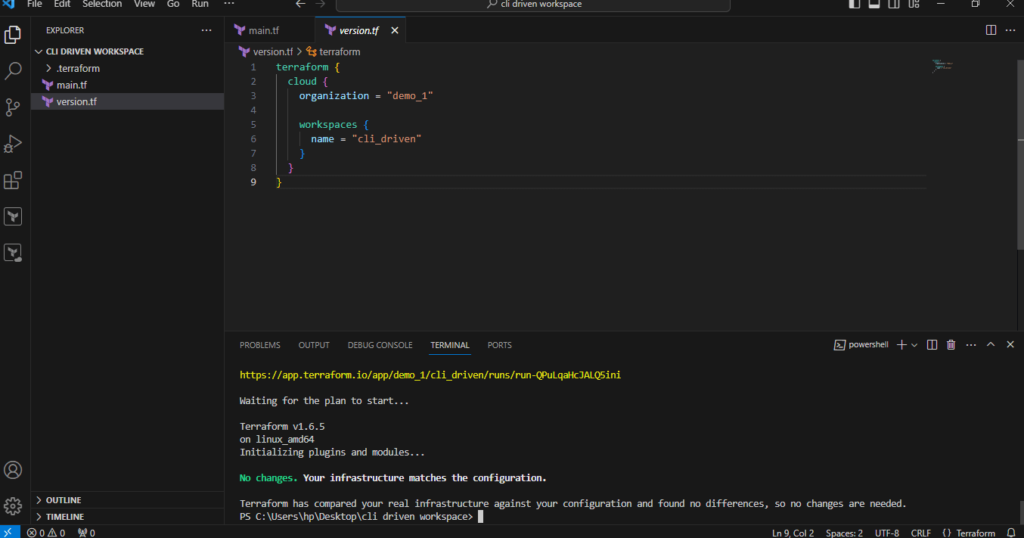
After creating workspace in cli driven you willget above guide in overview follow it and create .tf file while saving the code in code operator like visual studio code.
Replace placeholders with your actual Terraform Cloud API token and organization name.
- Verify in the Terraform Cloud UI: Navigate to the Terraform Cloud UI and confirm that the workspace has been created successfully.
Important Notes:
- Workspace Configuration:
- Ensure that your workspace configuration includes the required properties. Refer to the Terraform Cloud API documentation for details.
- API Token Permissions:
- The API token used must have the necessary permissions to create workspaces in the specified organization.
- Error Handling:
- Implement error handling in your script to check for successful API responses and handle any potential errors.
- API Rate Limiting:
- Be aware of API rate limits and adjust your script accordingly if you plan to create multiple workspaces in a short period.
This general guide should help you create a new workspace in Terraform Cloud. Keep in mind that Terraform Cloud’s features may evolve, so refer to the official Terraform Cloud documentation for the latest and most accurate information.
Create VCS driven workflow workspace in Terraform Cloud
Creating a version control system (VCS)-driven workflow workspace in Terraform Cloud involves connecting your Terraform Cloud account to a version control repository (e.g., GitHub, GitLab, Bitbucket) and configuring settings for the workspace. Here’s a step-by-step guide:
1. Log In to Terraform Cloud:
- Open your web browser and go to the Terraform Cloud website: https://app.terraform.io/.
- Log in using your HashiCorp account credentials.
2. Access the Workspaces Page:
- On the Terraform Cloud dashboard, navigate to the “Workspaces” page. This is typically found in the left navigation menu.
3. Create a New Workspace:
- On the “Workspaces” page, click the “New Workspace” button. This may also be labeled as “Create a new workspace” or something similar.
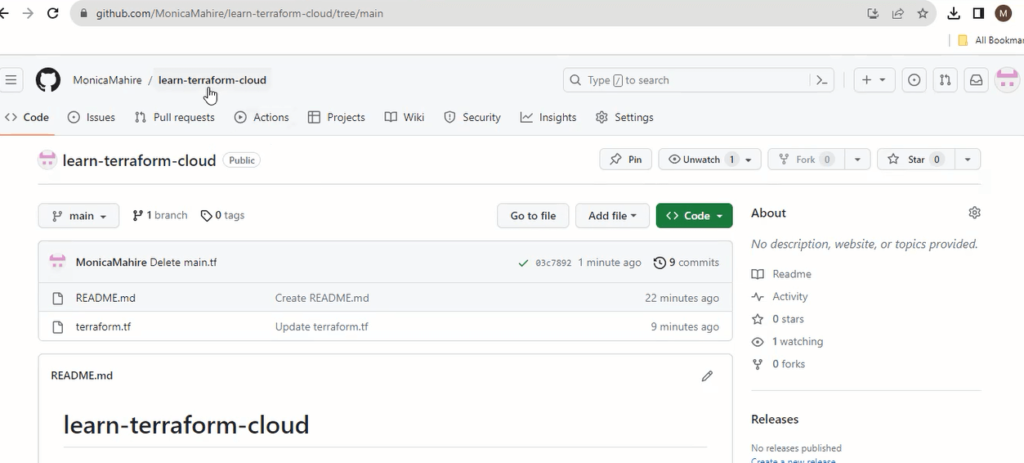
4. Select a Version Control System (VCS):
- Choose the version control system where your Terraform configuration is stored (e.g., GitHub, GitLab, Bitbucket).we have selected github and creating main.tf file.
5. Connect to Your VCS Repository:
- Follow the prompts to connect Terraform Cloud to your version control repository. This involves providing the repository URL, authentication (if required), and selecting the branch to track.
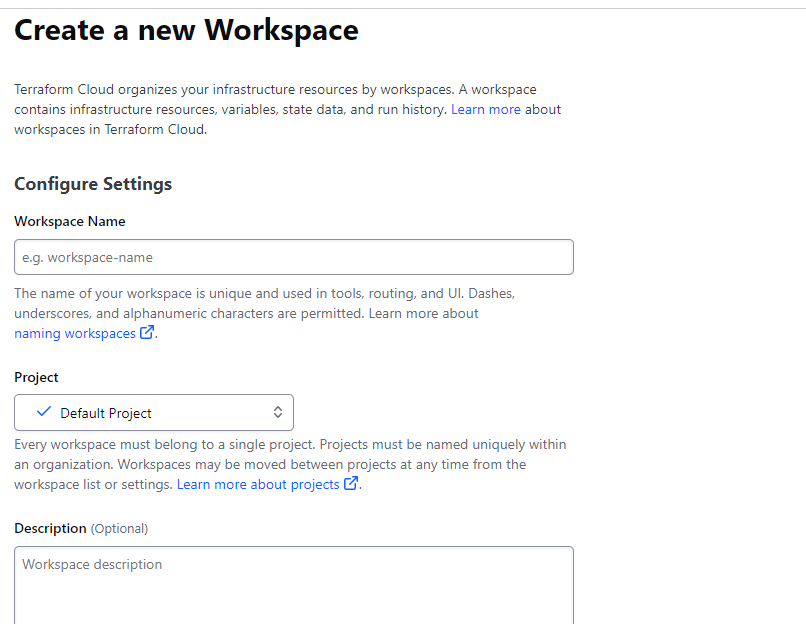
6. Configure General Settings:
- Provide a name for your workspace. This could be related to the environment (e.g., dev, staging, prod) or any naming convention that makes sense for your project.
- Optionally, provide a description to help identify the purpose of the workspace.
7. Configure Advanced Settings (Optional):
- Depending on your requirements, configure advanced settings such as Terraform working directory, auto-apply settings, and more.
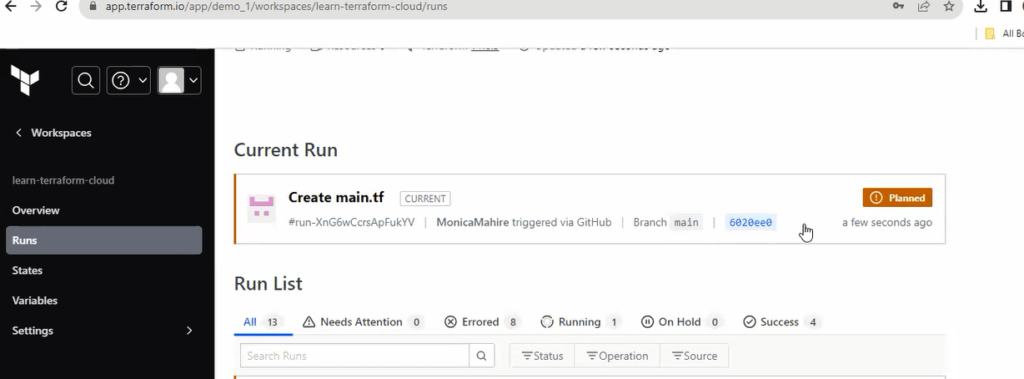
8. VCS-Driven Configuration:
- Ensure that the “VCS-driven workflow” option is selected or enabled. This setting allows Terraform Cloud to automatically trigger runs based on changes to your version control repository.
9. Branch and Trigger Settings:
- Specify the branch to track for changes. By default, this is often set to “master” or “main.” You can also configure trigger settings to control when runs are triggered (e.g., only on pushes to certain branches).
10. Create the Workspace:
11. Initial Run and Configuration Detection:
12. Review and Monitor:
Important Notes:
- Variables and Sensitive Data:
- If your configurations require variables (including sensitive ones), you can configure them in the “Variables” tab of the workspace.
- Workspace Organization:
- Consider creating separate workspaces for different environments or projects to manage configurations more effectively.
- Collaboration:
- Terraform Cloud provides collaboration features, allowing multiple team members to work on the same infrastructure. You can invite collaborators to your workspace.
This guide should help you set up a VCS-driven workflow workspace in Terraform Cloud. As always, refer to the official Terraform Cloud documentation for the latest and most accurate information.
Create EC2 Instance in AWS using Terraform Cloud
Creating an EC2 instance in AWS using Terraform Cloud involves defining the necessary Terraform configuration, setting up the required variables, and then applying the configuration using Terraform Cloud. Below is a step-by-step guide to help you achieve this:
1. Prepare Your Terraform Configuration:
Create a new Terraform configuration file (e.g., main.tf) with the following content:
provider "aws" {
  region     = "ap-south-1"
}

resource "aws_instance" "Demo" {
  ami           = "ami-062df10d14676e201"
  instance_type = "t2.micro"

  tags = {
    Name = "Demo"
  }
}
This basic example creates an EC2 instance in the specified AWS region using the Amazon Linux 2 AMI.
2. Configure Variables (Optional):
You might want to parameterize your configuration by using variables. Create a variables.tf file:
variable "aws_access_key" {}
variable "aws_secret_key" {}
3. Initialize Your Configuration:
Run the following commands in your terminal to initialize your Terraform configuration:
terraform init4. Configure Your Credentials:
If you’re using Terraform Cloud, you don’t typically store credentials in your local configuration. Instead, you set up environment variables or configure credentials in the Terraform Cloud workspace.
For local testing (not recommended for production), you can set your AWS credentials as environment variables:
export AWS_ACCESS_KEY_ID="your-access-key-id"
export AWS_SECRET_ACCESS_KEY="your-secret-access-key"
5. Create a Terraform Cloud Workspace:
- Log in to your Terraform Cloud account.
- Create a new workspace.
- Connect the workspace to your version control system (VCS) if you haven’t already.
- Configure any required variables in the Terraform Cloud workspace. You may need to add variables like
aws_access_keyandaws_secret_key.
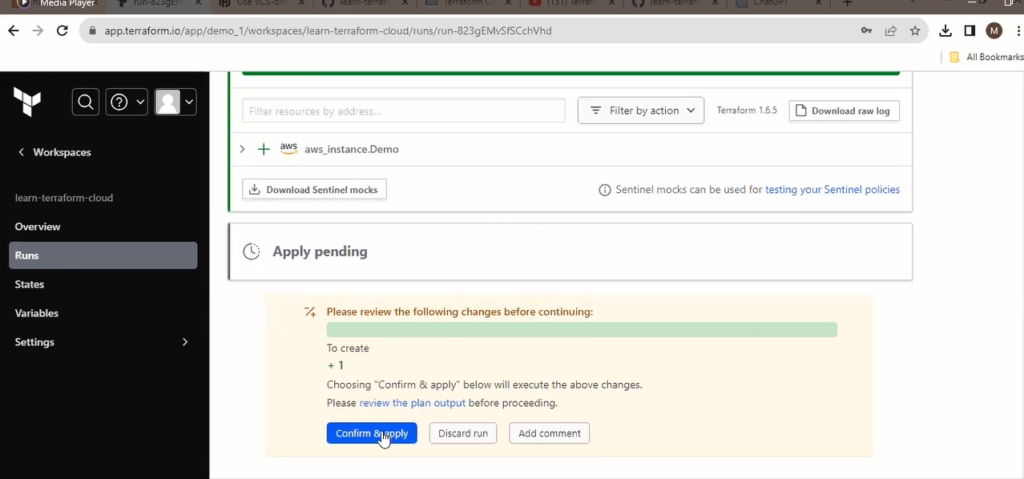
6. Queue and Apply a Plan:
- Trigger a Terraform run within the Terraform Cloud workspace.
- Terraform Cloud will automatically detect changes, create a plan, and apply the plan if approved.
7. Review the Output:
- After the run completes, review the output in the Terraform Cloud UI to ensure that the EC2 instance was created successfully.

Important Notes:
- Security Considerations:
- Avoid hardcoding sensitive information like credentials. In production, consider using IAM roles and other secure methods for handling credentials.
- Variables and Inputs:
- Adapt the Terraform configuration to suit your specific requirements by modifying variables, instance types, and other parameters.
- Documentation:
- Always refer to the official Terraform AWS provider documentation for the latest and most accurate information.
This guide provides a basic setup for creating an EC2 instance using Terraform Cloud. Ensure you follow best practices and security guidelines when working with infrastructure as code in production environments.
Destroy Resources and Workspaces in Terraform Cloud
Destroying resources and workspaces in Terraform Cloud involves initiating a Terraform destroy operation to delete the provisioned infrastructure and then removing or deleting the workspace. Here are the steps:
1. Destroy Resources:
Locally (Optional):
If you have access to the local environment where Terraform was originally applied, you can run the following command to destroy resources:
terraform destroyMake sure to provide any necessary variables if prompted.
Using Terraform Cloud:
- In the Terraform Cloud UI, navigate to the specific workspace containing the resources you want to destroy.
- Click on the “Runs” tab.
- Click on the “Queue Plan” button.
- Terraform Cloud will automatically generate a destroy plan. Review the plan to ensure it is targeting the correct resources.
- If everything looks correct, confirm and apply the destroy plan.
- Monitor the run logs to verify that the resources are being destroyed successfully.
2. Remove Workspace:
After destroying the resources, you can remove the Terraform Cloud workspace if you no longer need it.
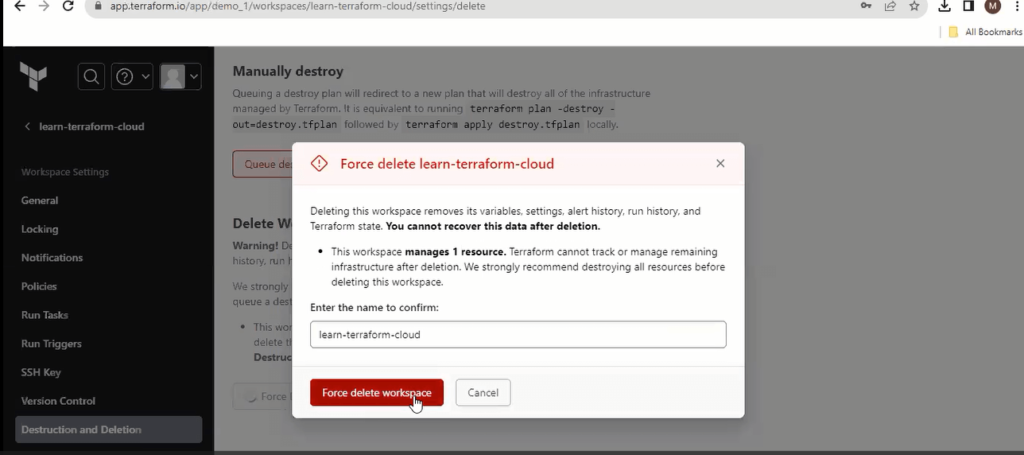
- In the Terraform Cloud UI, navigate to the specific workspace you want to remove.
- Click on the “Settings” tab.
- Scroll down to the “Danger Zone” section.
- Click on the “Delete Workspace” button.
- Confirm the deletion. This action permanently deletes the workspace and all associated data.

Important Considerations:
- Confirmation:
- Always double-check the destroy plan before applying it to make sure it targets the correct resources.
- Data Retention:
- Deleting a workspace in Terraform Cloud removes all associated data, including state files. Ensure you have backups or exports of critical data before deleting workspaces.
- Permissions:
- Ensure that you have the necessary permissions to destroy resources and delete workspaces.
- Safeguarding Production:
- Be extra cautious when destroying resources in a production environment. Consider having approval processes or restrictions in place.
- Terraform Version:
- Ensure that you are using a version of Terraform that is compatible with the features and functionality of Terraform Cloud.
- Documentation:
- Always refer to the official Terraform Cloud documentation for the latest and most accurate information.
By following these steps, you can safely destroy resources and workspaces in Terraform Cloud. Always be mindful of the impact on your infrastructure and double-check actions in critical environments.
Conclusion:
we have covered Terraform Cloud Tutorial|Create Variables Set |VCS-Driven Workflow |Create EC2 using Terraform Cloud | Introduction to Terraform Cloud and Workflows | Sign-up to Terraform Cloud | Create New Organization in Terraform Cloud | Create a Credentials Variable Set in Terraform Cloud | Create Workspace in Terraform Cloud | Create VCS driven workflow workspace in Terraform Cloud | Create EC2 Instance in AWS using Terraform Cloud | Destroy Resources and Workspaces in Terraform Cloud
Related Articles: